
Tips for Installing a Heated Driveway Snow Melting System
Radiant heated driveway systems are relatively easy to install and can be used to heat concrete, asphalt,
and paver driveways. Professional radiant heat system designers will talk with you and carefully design a
custom system that best suits your needs. They'll provide you with an AutoCAD that includes the
proper cable layout and materials, breaker sizes, load calculations, and number of breakers. Your electrician
and installers will know all the necessary project information prior to any installation taking place. This
can save you time and money, and help to ensure a proper installation.
THE INFORMATION ON THIS PAGE IS NOT INTENDED TO SUPERCEDE THE INFORMATION IN THE SNOW MELTING
SYSTEM INSTALLATION MANUAL. To ensure proper installation, carefully read and follow the instructions
provided in the product documentation.
Important Installation Information and Overview
Test the Cable: When installing an electric heated driveway system, perform OHM tests of the heat cable during all phases of the installation. (Test the cable out of the box, after it is laid out, and after the embeddment. This helps to ensure a successful installation. Be sure to document the results on the warranty card and send it to Warmzone to establish the warranty.) Also, be sure to always read the Installation Manual and follow the instructions. (View videos on testing the heat cable.)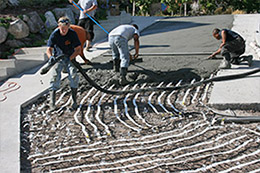 Prepare the Area:
Remove any debris that may pose a threat to the heat cable (such as nails or jagged rocks). Lay the cable
(or heating mat) out over the area you want to heat so you are sure that you have enough cable.
Prepare the Area:
Remove any debris that may pose a threat to the heat cable (such as nails or jagged rocks). Lay the cable
(or heating mat) out over the area you want to heat so you are sure that you have enough cable.Make sure that your electrician has experience installing radiant heat systems and is willing to contact Warmzone's installation support team with any questions. Ideally, the installer will have taken one of Warmzone's free installation training courses and received a certificate of completion.
 Cable Basics and Cautions: If care is not taken when working around the heat cables, metal shovels,
trowels, rakes and other tools can nick and damage the cable's insulation. This can lead to cable failure.
When possible, avoid walking on the cable. The heating cable should never have a spacing
of less than 2 inches and must be secured to the remesh reinforcement using tie-wraps,
zip ties or cable strapping. Fasten the cable at regular intervals to prevent it from being pushed
down by the weight of the heavy concrete during the pour. (The heating cable should typically be covered by 2 inches of
concrete. A thicker surface may be required, depending on the pour and application.) On new concrete pours, it is recommended
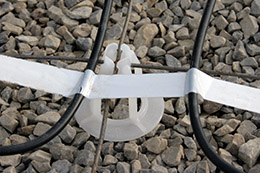
that you use Mesh-Ups to elevate the heating cable so it doesn't rest on the ground. (See the photo on the right.)
Do not attach the heating cable of the mat to the remesh in such a way that it is compressed or strained. The cable
must have some flexibility to move during the pour. Use scissors to cut the white tape to make turns or create an
individual run of heating cable. DO NOT CUT THE HEAT CABLE.
Cable Basics and Cautions: If care is not taken when working around the heat cables, metal shovels,
trowels, rakes and other tools can nick and damage the cable's insulation. This can lead to cable failure.
When possible, avoid walking on the cable. The heating cable should never have a spacing
of less than 2 inches and must be secured to the remesh reinforcement using tie-wraps,
zip ties or cable strapping. Fasten the cable at regular intervals to prevent it from being pushed
down by the weight of the heavy concrete during the pour. (The heating cable should typically be covered by 2 inches of
concrete. A thicker surface may be required, depending on the pour and application.) On new concrete pours, it is recommended
that you use Mesh-Ups to elevate the heating cable so it doesn't rest on the ground. (See the photo on the right.)
Do not attach the heating cable of the mat to the remesh in such a way that it is compressed or strained. The cable
must have some flexibility to move during the pour. Use scissors to cut the white tape to make turns or create an
individual run of heating cable. DO NOT CUT THE HEAT CABLE.Expansion Joints: Heating cable should never cross or pass through an expansion joint. Special precautions should be made if the heating cable is to be placed under a control joint. (Tooled or cut joints are not to exceed 1¼-inches in depth.) The heat cable must be at least ¾ to 1-inch from the bottom of the control joint.
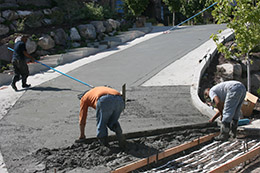 The ground wire is connected and the cold lead is attached to the transformer (inside the control box) and run
to the start of the heating cable. (Always refer to the Installation Manual for detailed instructions.) The
cold leads are spliced to the heat cable, which is laid out over the driveway or area to be heated.
(The cold leads come pre-spliced.)
The ground wire is connected and the cold lead is attached to the transformer (inside the control box) and run
to the start of the heating cable. (Always refer to the Installation Manual for detailed instructions.) The
cold leads are spliced to the heat cable, which is laid out over the driveway or area to be heated.
(The cold leads come pre-spliced.)
 When installing, it is important to remember that all of the heating cable and mat - including the splice to the
cold leads - is to be embedded so that only the non-heating leads are exposed outside of the pour. (See the
Proper Cable Splice Embeddment Illustration.) NEC standards
require that a conduit be used to run the leads out from the pour. The snow melting cable must be laid out evenly
over the entire area to be heated. Center-to-center (C-C) spacing is pre-set in ClearZone mats, but care must be
taken so that the mats don't touch or aren't too close to each other, otherwise a failure will occur. See
Warmzone's Common Installation Mistakes
web page to learn how to avoid making these mistakes when installing a heated driveway. Remember, Warmzone
provides free technical support, so don't hesitate to contact an installation expert at Warmzone if you have
any installation questions. Always refer to the installation manual and layout provided by Warmzone.
When installing, it is important to remember that all of the heating cable and mat - including the splice to the
cold leads - is to be embedded so that only the non-heating leads are exposed outside of the pour. (See the
Proper Cable Splice Embeddment Illustration.) NEC standards
require that a conduit be used to run the leads out from the pour. The snow melting cable must be laid out evenly
over the entire area to be heated. Center-to-center (C-C) spacing is pre-set in ClearZone mats, but care must be
taken so that the mats don't touch or aren't too close to each other, otherwise a failure will occur. See
Warmzone's Common Installation Mistakes
web page to learn how to avoid making these mistakes when installing a heated driveway. Remember, Warmzone
provides free technical support, so don't hesitate to contact an installation expert at Warmzone if you have
any installation questions. Always refer to the installation manual and layout provided by Warmzone.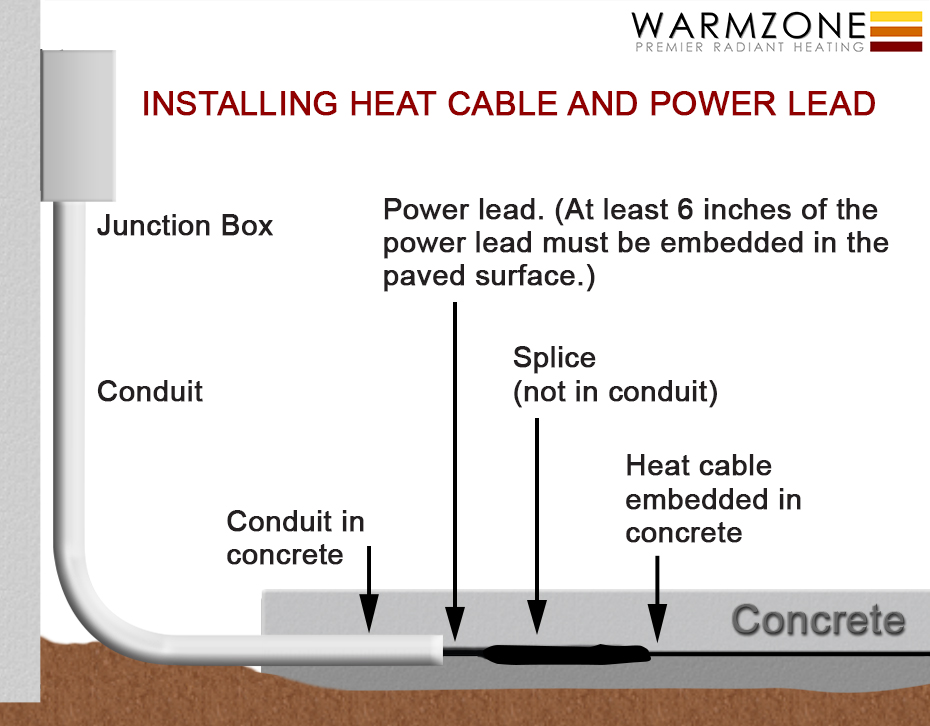
Installing a Radiant Snow Melting System
| 1. |
When installing the heat cable, begin laying it out as close as possible to the electrical source. Never cut or shorten the heating cable. Make certain that the splice between the cold lead and the heating cable is completely embedded along with 6-inches of the cold lead. (Remember to perform OHM tests of the heat cable out of the box, after it is laid out, and after the embeddment. See the videos "Checking the Heat Cable.") |
| 2. |
If the contactor panel is more than 15-feet away from heating cables/mats, plan where the junction boxes will be mounted (for connecting the heating cable to the contactor panel). Follow local code and the NEC guidelines for conduit sizes. |
| 3. |
Route all cold leads out from the pour through a conduit and to the junction box. (The splice and first 6-inches of the cold lead must be embedded in the heated surface.) The cold lead from the heat cable is not rated for direct burial in the ground and must be run through a conduit. Multiple cold leads may be in the same conduit, but the conduit must be sized for the circular square inches of the wire and de-rated for current, as per code. |
| 4. |
Run a conduit from the in-ground J-box (i.e., Quazite by Hubbell or Christy Box by Christy) into the surface being heated to within 6-inches of the cable splice. |
| 5. |
Use Mesh-Ups to elevate the heat cable so that it does not get pushed to the ground during the pour. Ideally, the heat cable should be about 2-inches from the driveway surface. Follow NEC and local codes for the minimum required conduit depth for your area. |
| 6. |
To ensure proper installation and a valid warranty, connecting the J-box and wiring of the system heating cable must be completed by a licensed electrician. |
| 7. |
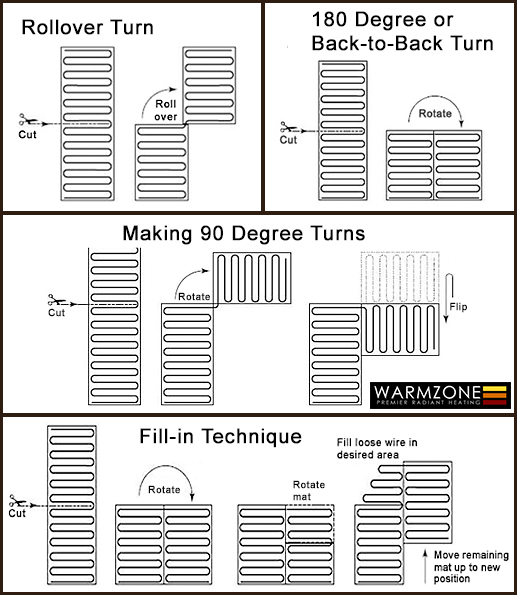
If you have too little or too much heat cable you can alter the cable spacing slightly to accomodate your needs. When installing mats, cut the white tape to expand or contract the cable spacing. Only do this to make minor adjustments, and remember that minimum cable spacing is 2 inches. |
| 8. |
If you are installing a ground sensor in the driveway, install the cup for the sensor BEFORE the pour. Position the sensor cup between two runs of heating cable located in the area it is to control. Do not run the ground sensor cord in the same power conduit as the cold leads. (For detailed installation instructions, please refer to the documentation provided in the packaging of the snow sensor.) |
| 9. |
Carefully pull the cold lead of the cable(s) through conduit pipes and into the junction box. Avoid using excessive force when pulling the cold leads so that you do not stress and damage the cable splice. |
| 10. |
Metal tools, sharp stones and debris can damage the insulation of the heating cable. Always keep the area clear of any objects that pose a potential risk to the heat cable. Do not use shovels or metal rakes to compact or spread the cement during the pour. |
Heated Driveway Installation - Helpful Illustrations and Videos
-
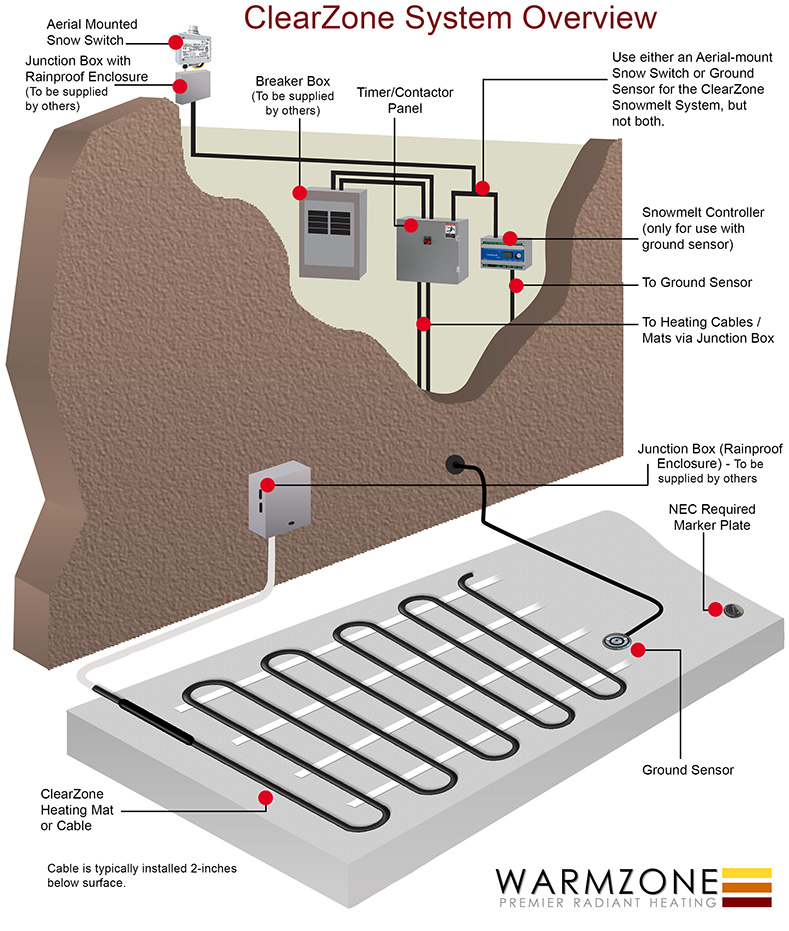
Snow Melting System Overview
Understanding the basics of a fully automated ClearZone heated driveways. View the snow melting system overview diagram.
How to Make Turns with Mats
Snow melting mats can be easily turned by cutting the white backing tape. NEVER cut the heating cable. How to Make Turns.
-
Embedding the Splice
Be sure to embed the splice to the cold leads so that only the non-heating leads are exposed outside of the pour.
"How-to" Videos and Free Training
Choose from a variety of instructional radiant heat installation videos or sign up for free installation training.